# Extra Stuff

# Video and Audio Conversion

Oh boy, here we go.

<span style="white-space: pre-wrap;">Converting video and audio is a delicate process. If done incorrectly, it can result in the quality of the video or audio dropping significantly. Sometimes, it can result in a file so bloated it puts some of Coalgirls’ releases to shame. Other times, video or audio quality drops even when the conversion is done correctly. All in all, video conversion should be avoided if possible. But, if you absolutely, positively, must convert a video, then this part of the guide will help you with that. </span>

First, some vocabulary you need to know.

> *****Codec*****  
> The algorithm used to encode and decode a video or audio stream. It is stored in a Container

> *****Container*****  
> The file extensions you are all probably familiar with. MOV, MKV, and MP4 are all “containers” that store video and audio streams encoded using codecs. Most containers, like MP4 and MOV, can only store specific codecs. A few, like MKV, can store almost any codec.

Next, install ffmpeg. Ask in #general-discussion on the discord for help with installation if you don’t know how, or consult everyone’s good friend Google. Make sure at some point you add ffmpeg to your “System PATH Variable,” sometimes just called “PATH.” There are other ways of converting video, but this guide will only use ffmpeg for the sake of simplicity.

First, navigate in the command line to the directory containing the video file you want to convert. Next, run this command:

`<span class="editor-theme-code">ffmpeg -i “(filename).(fileext)”</span>`

**(Replace “(filename)” and “(fileext)” with the file name and file extension, respectively)**

You should get a bunch of text that looks something like this:

![](https://wiki.holoresorttls.org/uploads/images/gallery/2025-12/lhQ3bXYvwaHKXd2M-embedded-image-jorfv4fy.png)

The most important part here is to check both streams (In the case of this image, streams #0:0 and #0:1), and see what codec each stream is using.

<span style="white-space: pre-wrap;">Looking at the image, we see the “Video” stream is using the avc1 codec, and the “Audio” stream is using the mp4a codec. This is good, as both these codecs are supported by the MP4 container, and we can convert the container to MP4 without losing any quality. HLR operates mostly on MP4 files, so your goal when converting video should be to convert the container to MP4. (Full list of codecs supported by the MP4 container can be found </span>[here](https://mp4ra.org/#/codecs)) To do this, we would run the following ffmpeg command:

`<span class="editor-theme-code">ffmpeg -i “(filename).(fileext)” -c copy “(filename).mp4”</span>`

But let’s say, for example, the Audio stream is using a codec not on the list, but the Video stream is. In this case, we can convert the audio stream to a codec compatible with MP4 (albeit with some quality loss), and copy the video stream without converting it. This is done with the following ffmpeg command:

`<span class="editor-theme-code">ffmpeg -i “(filename).(fileext)” -c:v copy -c:a aac “(filename).mp4”</span>`

For a case where the video stream is not compatible with MP4, it’s better to not convert if possible, as lost quality in video is much more noticeable than lost quality in audio. But, if you must convert the video stream, you can use the following command:

`<span class="editor-theme-code">ffmpeg -i “(filename).(fileext)” -c:v libx264 -c:a copy -crf 18 “(filename).mp4”</span>`

In the case where both codecs are incompatible with MP4, then run:

`<span class="editor-theme-code">ffmpeg -i “(filename).(fileext)” -c:v libx264 -c:a aac -crf 18 “(filename).mp4”</span>`

# VEGAS Pro Editing Guidelines

<p class="callout warning">The info in this article may be outdated.</p>

****These include VEGAS Pro-specific standards and guidelines to keep consistency with the rest of the Hololive Resort Subs uploads, especially those using Premiere Pro or other video editing programs and NLEs.****

### Version Specifics

It is recommended that you update to the latest version of VEGAS Pro so as to avoid certain bugs and take advantage of more features. Of course, you may still use the current version of VEGAS Pro that you currently have, but it may make things harder for you as an editor. These are versions to keep in mind:

- ****MAGIX VEGAS Pro 18****  
    Currently the latest version as of writing. The most important feature of this version is Advanced Save features, such as Incremental Save and Live Save. Incremental Save allows you to quickly save multiple versions of the same project, while Live Save lets you auto-save the project after every edit, in the same way as Google Docs-style autosaving. Both features allow you to prevent lost progress due to program crashing, which is expected from NLEs like Vegas Pro, especially with larger projects.
- ****MAGIX VEGAS Pro 17****  
    The one thing to keep in mind in this version is that 17 supports experimental direct importing of MKV files. Since this is experimental, expect the possibility of errors.
- ****MAGIX VEGAS Pro 14****  
    This version allows disabling resampling throughout the entire project. It is required that the project has resampling disabled on relevant parts, such as the clip being edited, as resampling may cause distracting visual artifacts or ghosting. Before this, you needed a script to disable resampling on the whole project.
- ****Sony Vegas Pro 13****  
    The most popular and easily accessible version of Vegas Pro. It may not have all the features aforementioned above, but it may be the most stable for you, depending on your system. However, this will make it more difficult to follow our standard.

### Project Settings

![](https://wiki.holoresorttls.org/uploads/images/gallery/2025-12/OfOx7gq74EBoYxC7-embedded-image-pl3sfvij.png)

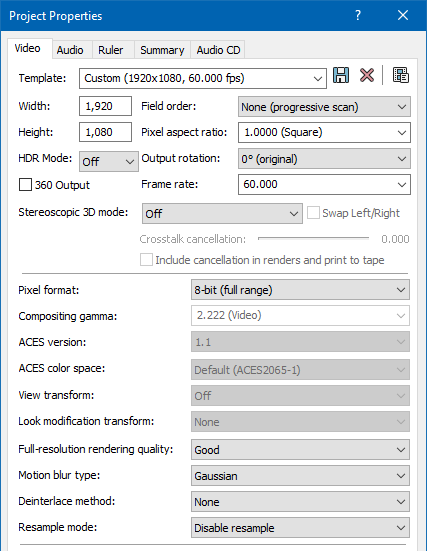
Please use these Project Properties when creating a new project in Vegas Pro.

<p class="callout info">NOTE: The difference between “Good” and “Best” Full-resolution rendering quality is the resize algorithm. Best uses bicubic/integration while Good uses bilinear. If your PC can support it, select “Best”. If not, “Good” is fine.</p>

<p class="callout info">NOTE: In Sony Vegas Pro 13, the “Resample mode” option does not exist. Please refer to this guide for disabling resampling throughout the whole project for Vegas Pro 13. You may also just disable resampling in the clip that you’re working on and leave everything else resampled.</p>

### Working with HLR Files

As an editor, you will receive an MKV file from a subber. You have two choices for working with these files: MKV Import or MP4 Conversion.

#### MKV Import

<span style="white-space: pre-wrap;">You may directly import the MKV file using VEGAS Pro’s experimental MKV feature. This is disabled by default, so to use this feature, you will need to enable it. This can be done by going to </span>`<span class="editor-theme-code">Options > Preferences… > File I/O > Enable MKV Reader (Experimental)</span>`<span style="white-space: pre-wrap;"> and enabling it.</span>

![](https://wiki.holoresorttls.org/uploads/images/gallery/2025-12/O7Pn8MoY359Ud04x-embedded-image-jzbhyc0u.png)

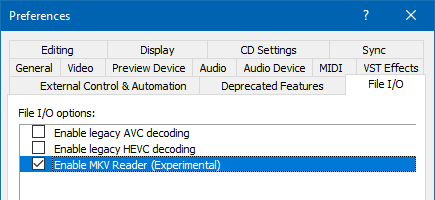
Should VEGAS Pro reject the MKV, it may be because the MKV has an unsupported audio codec. Please use this ffmpeg command:

`<span class="editor-theme-code">ffmpeg -i “(Subbed File Name).mkv” -c:v copy -c:a aac -crf 17 “(Subbed File Name).mkv”</span>`

#### MP4 Conversion

You may convert the MKV to MP4 to easily be accepted by VEGAS Pro. Please use this ffmpeg command:

`<span class="editor-theme-code">ffmpeg -i “(Subbed File Name).mkv” -c:v copy -c:a aac -crf 17 “(Subbed File Name).mp4”</span>`

<p class="callout info">Same as was said on the other guide, Avidemux is also free and can do this with a UI.  
[![image.png](https://wiki.holoresorttls.org/uploads/images/gallery/2025-12/scaled-1680-/JoT9Wj5L2vH8rNI9-image.png)
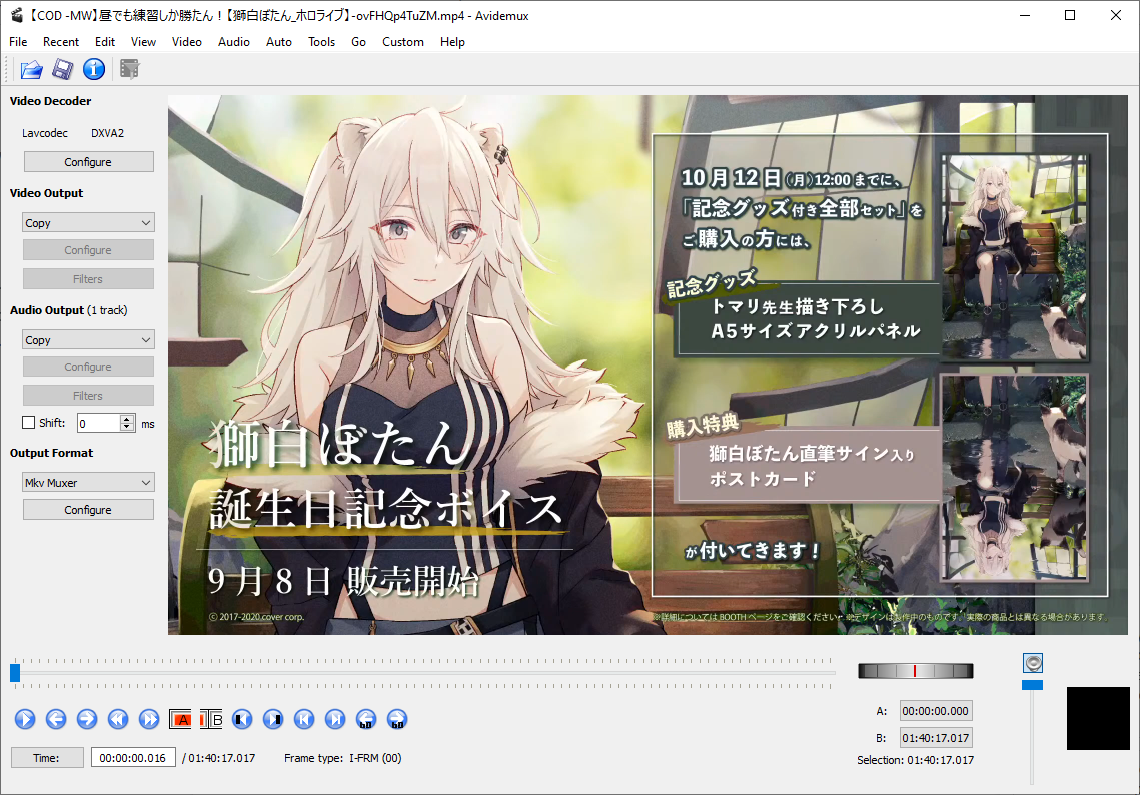
](https://wiki.holoresorttls.org/uploads/images/gallery/2025-12/JoT9Wj5L2vH8rNI9-image.png)</p>

#### Working with Transparent Intro and Outro

VEGAS Pro supports transparent MOV files through the QuickTime codec. Do not use green screen / chroma keying for this process, regardless of the presence of a green screen file. Please use the transparent MOV for this process.

### Render Settings

Please use these settings for making the final render:
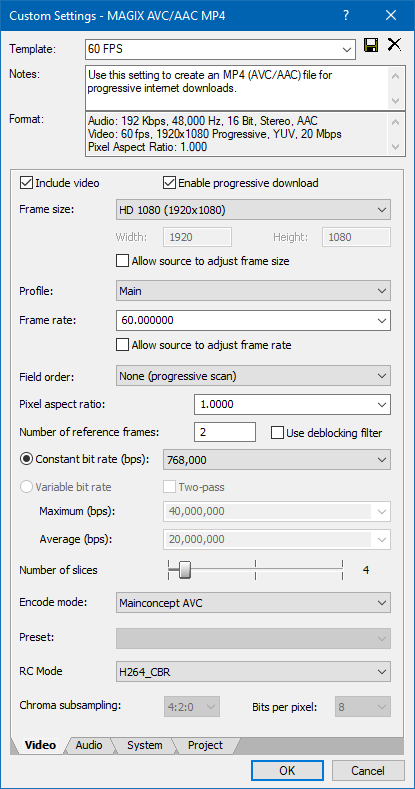
![](https://wiki.holoresorttls.org/uploads/images/gallery/2025-12/YtBYzAhdcamwd5Cn-embedded-image-eu0eelof.png)

<span style="white-space: pre-wrap;">To create this template, use the </span>`<span class="editor-theme-code">MAGIX AVC/AAC MP4</span>`<span style="white-space: pre-wrap;"> format or the </span>`<span class="editor-theme-code">MainConcept AVC/AAC</span>`<span style="white-space: pre-wrap;"> format (for VEGAS Pro 13), select the </span>`<span class="editor-theme-code">Internet HD 1080p 59.94 fps</span>`<span style="white-space: pre-wrap;"> template or the </span>`<span class="editor-theme-code">Blu-ray 1920x1080-60i, 25 Mbps video stream</span>`<span style="white-space: pre-wrap;"> template (for VEGAS Pro 13), and click on </span>`<span class="editor-theme-code">Customize Template…</span>`<span style="white-space: pre-wrap;"> to modify the template in accordance with our standards in the picture above.</span>