Subbing Guidelines
Contains all information required by HoloResort Translations subtitlers, timers, and typesetters.
The goal of a subber or subtitler is to overlay, style, time, edit, and render subtitles efficiently into our videos with high quality. This guideline is only useful if you already know the basics of Aegisub. The documentation for Aegisub is available here.
Written by rikunandakedo, Madekuji, and Sheer Curiosity.
- Disclaimer
- Aegisub Setup
- Timing Guidelines
- Lead-ins and Lead-outs
- Connected Lines
- Keyframing
- Blinking and Line Splitting
- Multiple Speakers and Collabs
- Tips and Shortcuts
- Additional Timing References
- Typesetting Guidelines
- Intro
- Typeface Style Guide
- Margins, Alignment, and Positioning
- Line Breaking and CPS
- Double Border
- Tips and Shortcuts
- Typesetting Examples
- Additional Typesetting References
- Tag Manipulation Guidelines
- Hardsubbing Subtitles
- Subbing for YouTube Closed Captions
- Automation Tools
Disclaimer
These guidelines are only mandatory for HoloResort Translations (a.k.a. HLR) but have been made public for everyone so they can take a reference on what the team prescribes as the minimum “acceptable” standards to provide within the VTuber clipping community. If you are not a part of the referred team, you are free to follow or ignore the document.
This document is also not finished nor finalized and things may be added or modified at any given time. As the standards of the team and general community evolve, we will also continue to evolve and provide the quality our team strives for.
If you have any changes you’d like to be made or have things that are yet to be added, please contact me through Discord (rikunandakedo#3217) or any HLR team leader. Thank you for your contribution!
P.S. The only necessary parts are Timing, Typefacing, and Hardsubbing. The rest are just a bonus if you want more “advanced” techniques.
Aegisub Setup
Which Aegisub version am I supposed to use this time?
Please use the arch1t3cht fork of Aegisub available here. It is also the same version being used by the fansubbing cartel other fansubbers and fansubbing groups.
Features over other Aegisub versions:
- Still being maintained
- Has support for DependencyControl to install scripts
- Support for folding lines; think of them as folders for lines
- Supports video panning from Daydream Cafe fork
- Has experimental dark mode support for Windows (via the wx master build)
- Cross-platform for Windows, macOS, and Linux
- ...and more!
It uses the TypesettingTools version (now the upstream) of Aegisub as the base and brings in many improvements from other forks, such as the wangqr and Daydream Cafe forks while also remaining cross-platform.
Can I still use base / upstream Aegisub?
Yes, you may still use the default version of Aegisub for creating subtitles, specifically version 3.4 or above. The newer versions are now based on the TypesettingTools fork as well, and have been merged to upstream.
For HoloResort Translations subbers and quality checkers, it is not recommended to check other subbers' work using base / upstream Aegisub, as the base version does not have support for folding, and you may have issues determining quality without the video panning feature. It is highly encouraged and recommended to use the arch1t3cht fork for Sub QC.
Timing Guidelines
Lead-ins and Lead-outs
What are lead-ins and lead-outs?
- These are the spaces in time between the text appearing on-screen and the audio becoming audible.
- Lead-ins are the time when the subtitle shows up before the talent speaks.
- Lead-outs are the time the subtitles disappear after the talent speaks.
- This is used to get the viewer to sync up the subtitles with the audio by compensating for the time it takes for the brain to process both sight and hearing.

Minimum and recommended values
|
|
Minimum | Recommended |
|
Standard lead-in |
at least 150ms | 250-300ms |
| Standard lead-out | at least 300ms | 500-600ms |
Just because they’re the minimum, doesn’t mean it’s appropriate to stay at the minimum at all times. Some subtitled lines can look better if they have extended lead-ins and lead-outs when appropriate, so you are free to add time if they look better that way. If timing is very tight, you can experiment with lowering the lead-ins and lead-outs beyond the minimum, with a focus on lowering lead-out time first.
Connected Lines
If the next line of the same speaker is around or less than 500ms (including lead-ins and lead-outs), connect the lines together by snapping the current line to the next line.
This means the end of the current time is the start of the next one.
Some subbers and viewers are more sensitive to short lead-outs and blinking, and may prefer lines to be connected even if they’re more than 500ms apart. This may be the case for people with low reading speed. For example, Madekuji has a preferred lead-out of 500ms-600ms instead of the standard minimum 300ms.
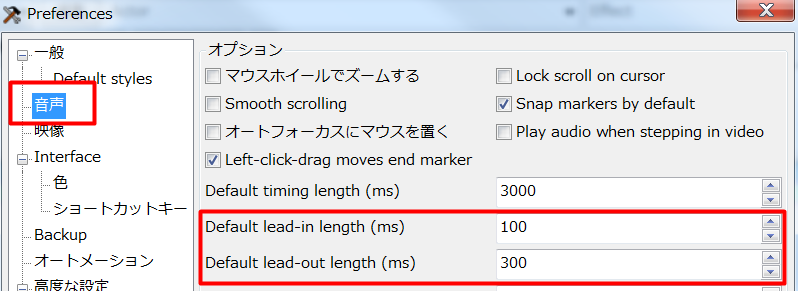
You can use the key binds “C” and “V” to add lead-ins and lead-outs correspondingly.
You can change the amount it adds by going to View > Options > Audio > Default lead-in/out length (ms) in Aegisub.
Keyframing
What are keyframes?
- These are sudden and instantaneous transitions to a different scene. (e.g. Jump Cuts, Camera Switches)
- If you encounter one of these, the lead-out should be on the exact frame before the transition happens.
When there are already subtitles in a video:
- You should try to match the keyframes of the hardsubbed subtitles in the video to your subtitles.
- You can also try to mask the hardsub so you don’t have to match it but this requires editing software.
Blinking and Line Splitting
Blinking
Blinking, also known as “flashing” or “gaps”, is a moment when the timed subtitles disappear and reappear within a few milliseconds/frames. It creates a subtitle effect where subtitles appear to “blink” due to the quick succession of a subtitle, a blank space, then a subtitle, caused by a timing gap in-between subtitles. The gaps in blinking are usually a few milliseconds or frames missing.
This is a rookie mistake for a lot of new subbers.
Blinking must be avoided at all costs. It causes reading strain and flashing effects, which may induce discomfort, especially to those with photosensitive epilepsy.
For HoloResort Translations subbers, your work will be sent back to you to edit if you submit an ASS file that contains blinking unless you can explain why the effect is necessary for the project you are working on.
You can enable “Snap markers” by checking View > Options > Audio > Snap markers by default in Aegisub.
This lets Aegisub snap audio markers to other markers whenever you click or drag them if they are close enough, reducing the chances of accidentally creating blinking effects.
Line Splitting
Avoid timing a single line for too long. If the line can be broken up into multiple sections, break it apart as such.
- This is also to be hand in hand with the ellipsis/em-dash rules from proofreading.
- This is purely up to your judgment. Do what feels right for you and others.
Multiple Speakers and Collabs

- Time them chronologically
- The gap between the two speakers shouldn’t be too far away from each other in terms of how many lines they are separated in aegisub.
- As much as possible, make sure that both lines appear and disappear at the same time.
- If one of the speakers ends at least 500ms earlier (including lead out), then you may cut the line’s timing there.
- No matter what, the lead-ins of both speakers should relatively stay the same and appear together.
Tips and Shortcuts
Keyboard Shortcuts
- A - Slide the audio bar to the Left.
- S - Plays the audio entirely.
- D - Plays the last 500ms of the audio.
- F - Slide the audio bar to the right.
- G/Enter - Commit the timing for the line
- Z - Go to the previous line
- X - Go to the next line
- C - Add a set amount of lead-in to the timing (default is 300ms)
- V - Add a set amount of lead-out to the timing (default is 300ms)
Changing Settings
You can change the amount on the settings (Alt+O)
You can check “Snap markers by default” to easily manage blinking/overlapping.
Timing Post Processor
You can use the “Timing Post Processor” to automatically fix and clean out missed blinkings.
However, this does not work if you are working with a collab stream where multiple people are speaking.
Additional Timing References
Here are some additional resources you may find useful:
- VTuber Clips Timing Guide by Jin Teramachi
- Basics of Timing in Aegisub by unanimated
- Timing subtitles to audio in Aegisub Docs
Typesetting Guidelines
Intro
You should generally use the Style Editor when editing the subtitles.
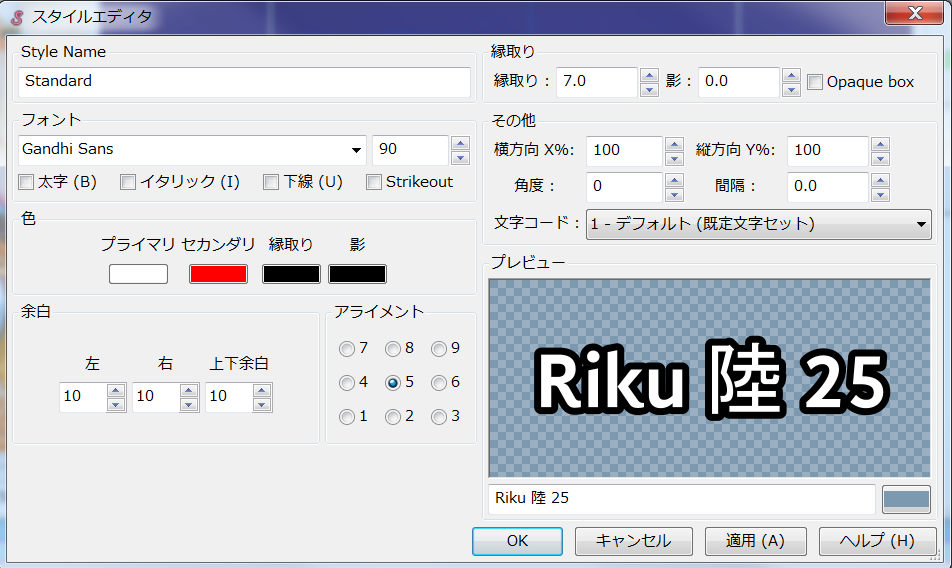
This can be accessed by clicking on the S icon in the toolbar or by clicking Edit next to the style dropdown.
Typeface Style Guide
These are the preferred settings for subtitle typefacing.
This is in the situation of a 1080p video.
HLR Standards
These are guidelines to be followed by HoloResort Translations subbers.
Font Family | Noto Sans Japanese (Noto Sans JP)
|
Font Size | 100-120 (Standard is 110)
|
Border or Outline Size | 7-8 (Standard is 7.5) |
Border or Outline Color |
|
Shadow | 0-1 (Standard is 0.5)
|
General Standards
For general and basic typesetting advice, we recommend lyger's Subtitling Guide.
These are all-purpose guidelines we recommend for all subbers.
Font
- It should be easily distinguishable.
- It should be moderately thick.
- There are no unnecessary shapes to the characters.
Font Size
- The cap height should cover around 8% of the screen.
- ~80 pixels on a 1080p video.
- Too small and it can’t be read on mobile vertical; Too big and it’ll steal most of the attention.
Border Size
- ~⅓ of the font’s thickness.
- Eyeball it until it feels right.
- Find the right balance for your font.
Border Color
- VTuber Color Reference.
- It should be easily distinguishable who’s who. Especially in a collab.
Shadow
- Personally, using it other than indenting text is just a waste.
- I won’t go past 3
- Might use it for ShadTrick instead.
Note to HLR Docs Editors:
- Link to ShadTrick
Margins, Alignment, and Positioning
It's not just about how each of the letters and lines look, but a major part of how subtitles can look good and be readable is how the subtitles are framed within the video. Specifically, the margins, alignment, and positioning of the subtitles.
For general and basic typesetting advice, we recommend lyger's Subtitling Guide.
Margins
The Left and Right margin should at least be 60 (Standard is 150)
- It shouldn’t be anywhere near the edge of the screen.
- It should always be near the center.
Vertical margin should at least be 80 (Standard is 100).
The position of the subtitles should NOT be touching the YouTube player bar.
It shouldn’t be able to cover more than the chin of the talent.
Alignment
an2for general subtitles.an5for tag manipulation and animations.- an7 for drawings.
Positions
The positions are dependent on what you are subbing.
- If the video is a Free Talk or Story Telling, it should be centralized on either the center of the screen or where the talent is.
- If the video is a game-play, it should be centralized on the gameplay and avoiding GUIs and Menus.
- The consensus is it should be over where the audience will be looking.
These are common examples of where subtitles should go.
Collabs
Define their positions. If one goes on top of the other, that one should always be on top and vice versa.
If there is a line break, put the top’s position to the one below.
- If the top speaks earlier and has a line break but the bottom also speaks later on, keep the top’s original position.
Line Breaking and CPS
Note: This section is partially based on the BBC Subtitle Guidelines.
CPS (Characters Per Second)
CPS measures the number of characters, including spaces and punctuation, that appear in subtitles per second.
- Amara
Characters per second is the scale of how readable text is in conjunction with reading speed. It determines whether or not there is enough time to read a certain subtitle line comfortably and without trouble. The simple objective is: low-ish CPS good, high CPS bad.
|
|
|
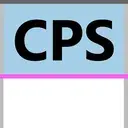
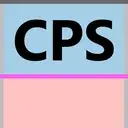

The CPS column in Aegisub scales from white to red depending on how high it is. Red CPS signifies that it is already dangerously high.
- Always keep it below 20. If it’s higher than that, you should contact your PRs to reword the sentence.
- If your CPS is less than 5, this means the line has a lot of space to work with and you can split and break it down.
- 20 (absolute max 25) if it's a long line (like more than 3 words)
- 15 (absolute max 20) if it's a short line (like 3 words or less)
- Theoretical maximum CPS is 25 and this is for Book Readers.
Line breaking (\N or Shift + Enter)
- An ideal line break will be at a piece of punctuation like a full stop, comma, or dash.
- A line break should always be before a pronoun/name.
- Avoid splitting the following parts of speech:
- article and noun (e.g. the + table; a + book)
- preposition and following phrase (e.g. on + the table; in + a way; about + his life)
- conjunction and following phrase/clause (e.g. and + those books; but + I went there)
- pronoun and verb (e.g. he + is; they + will come; it + comes)
- parts of a complex verb (e.g. have + eaten; will + have + been + doing)
- Make sure the line break is justified. This means that the subtitles’ margins should relatively be weighed the same.
- There are some exceptions to this, such as when a word you’ll be line breaking is too long, you should prefer it to be bottom-heavy.
There should only be 1 line break.
No matter what, there should only be 2 lines stacked on top of each other. If a sentence is too long, break the sentence down and split it into multiple lines instead.
Collabs
If the video has multiple speakers, the maximum lines stacked that should appear is 3.
- If there are only 2 speakers, The one who is the main speaker of the conversation will get a line break while the other does not.
- If 3 speakers are speaking on top of each other, they each only get 1 line. No line breaks.
If there’s more than 3, good luck.
Double Border
- Installation of automation tools will be more detailed below.
- Double borders are used to give more visibility to the text for the viewer.
- It’s only used if:
- The border color is too light.
- If it’s yellow, always use Double Border.
- The margin of the subtitles already has text behind it.
- The margins of the subtitles are noisy and hard to see without it.
- The border color is too light.
This is the settings used for adding double border:
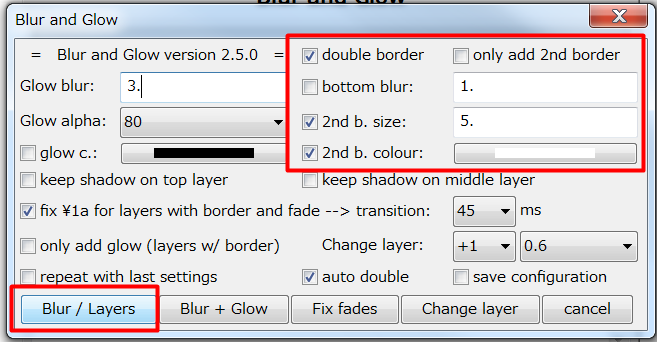
You can check “save configuration” to save this configuration.
Shadow Indention can be used as a substitute or in addition.
Tips and Shortcuts
You can save styles on your style manager to always have a preset whenever you are doing a new project. This can save time if you have all the default settings already made and just need to be readjusted accordingly.
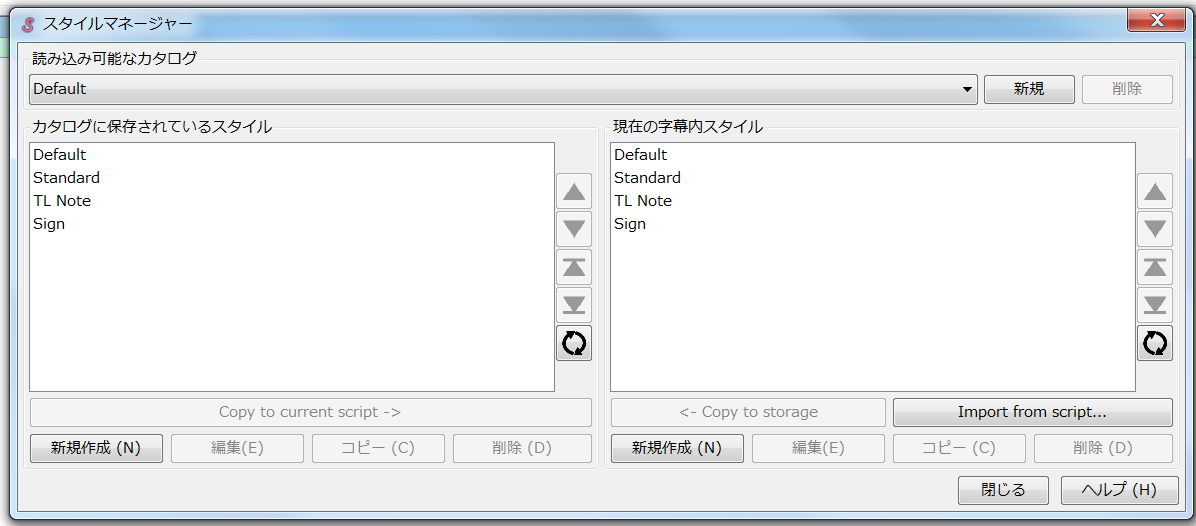
Having a standard that fits this guideline is advisable.
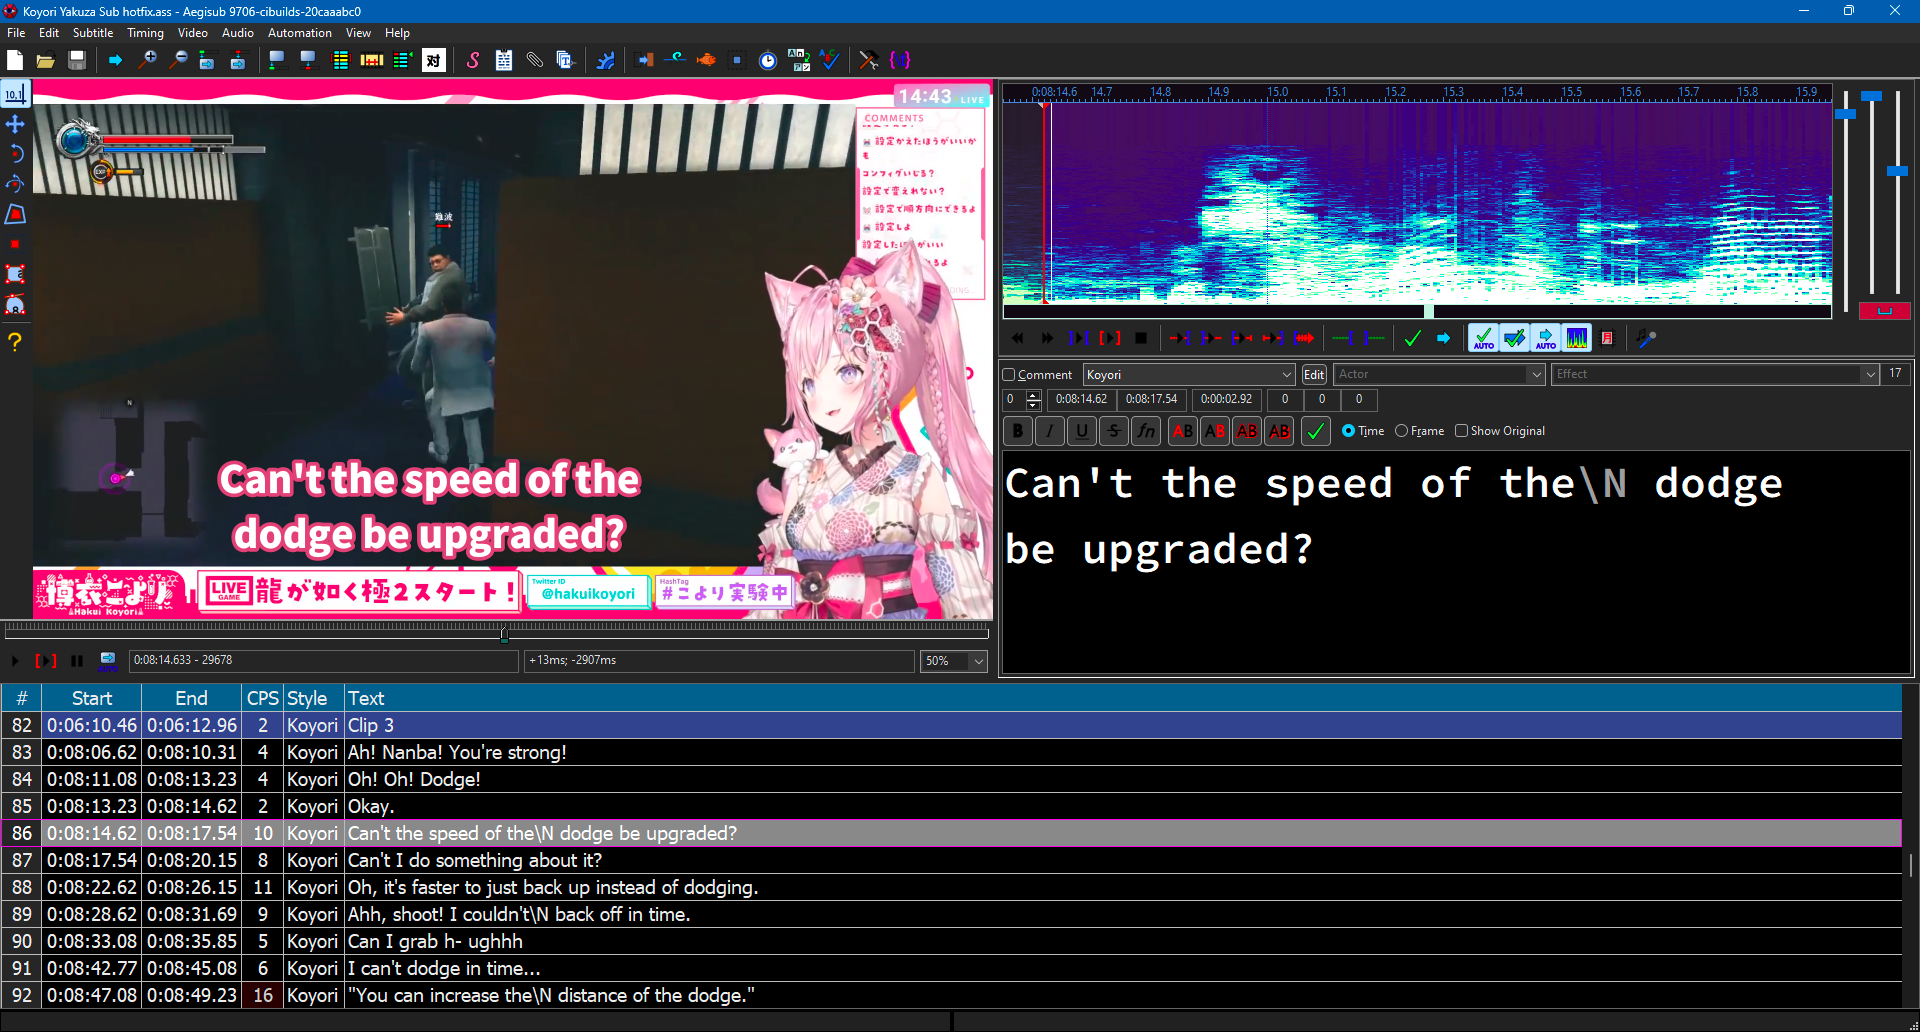
Typesetting Examples
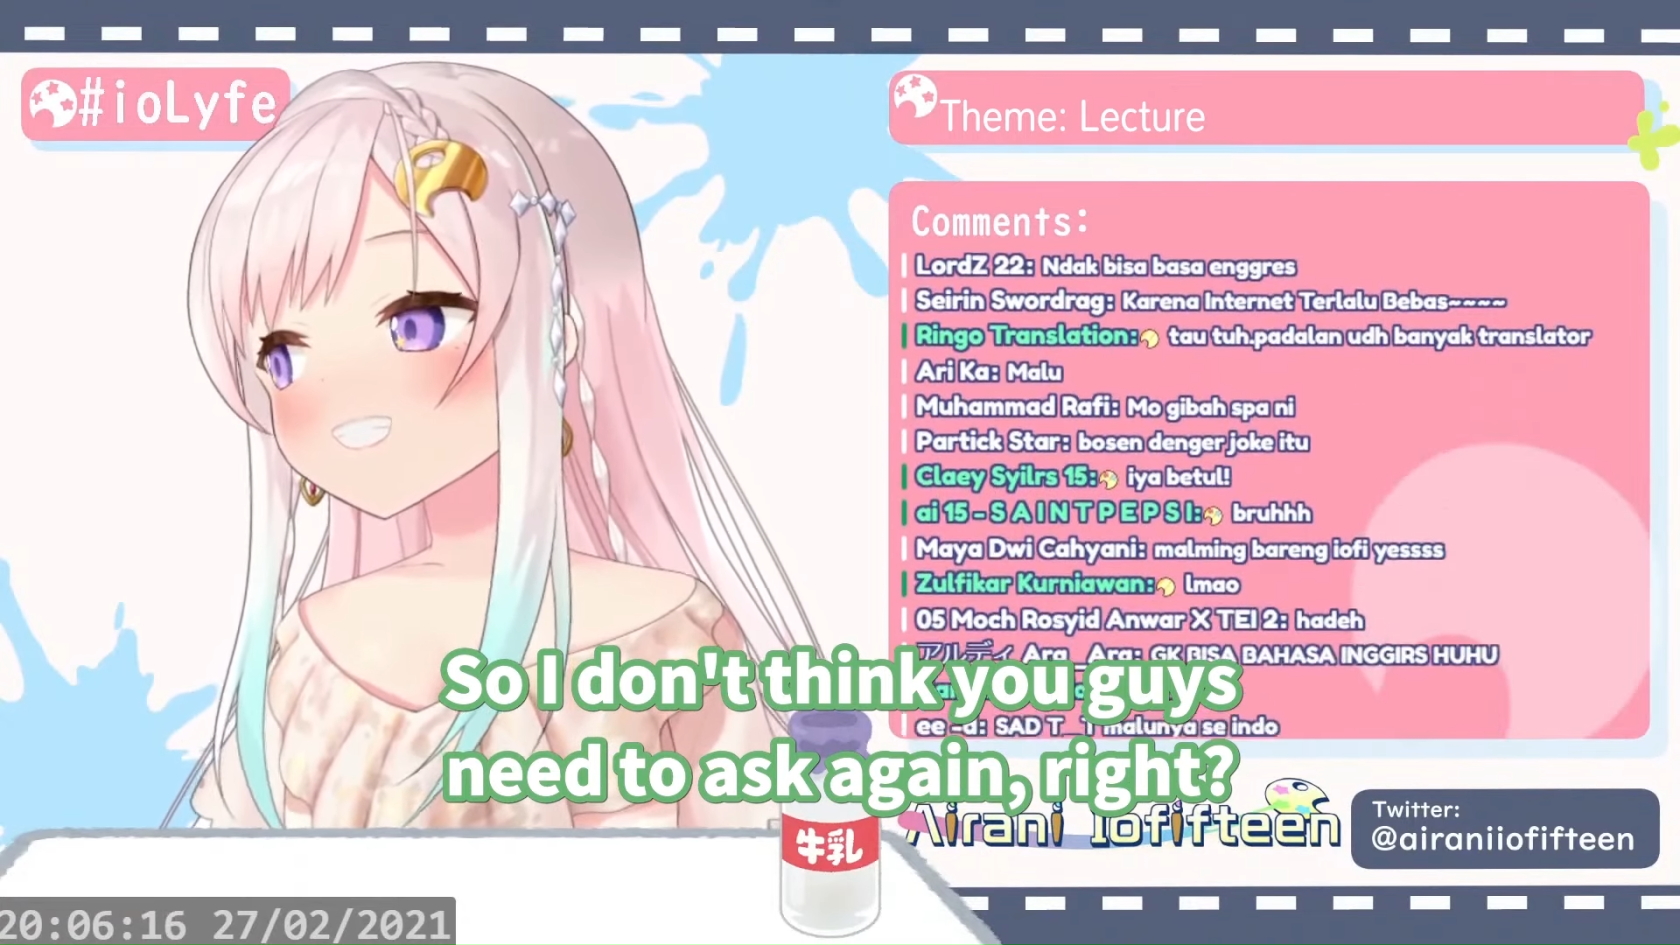
Standard subtitles under normal circumstances
Taken from Iofi has to scold her chat [Hololive Eng Sub | Airani Iofifteen]
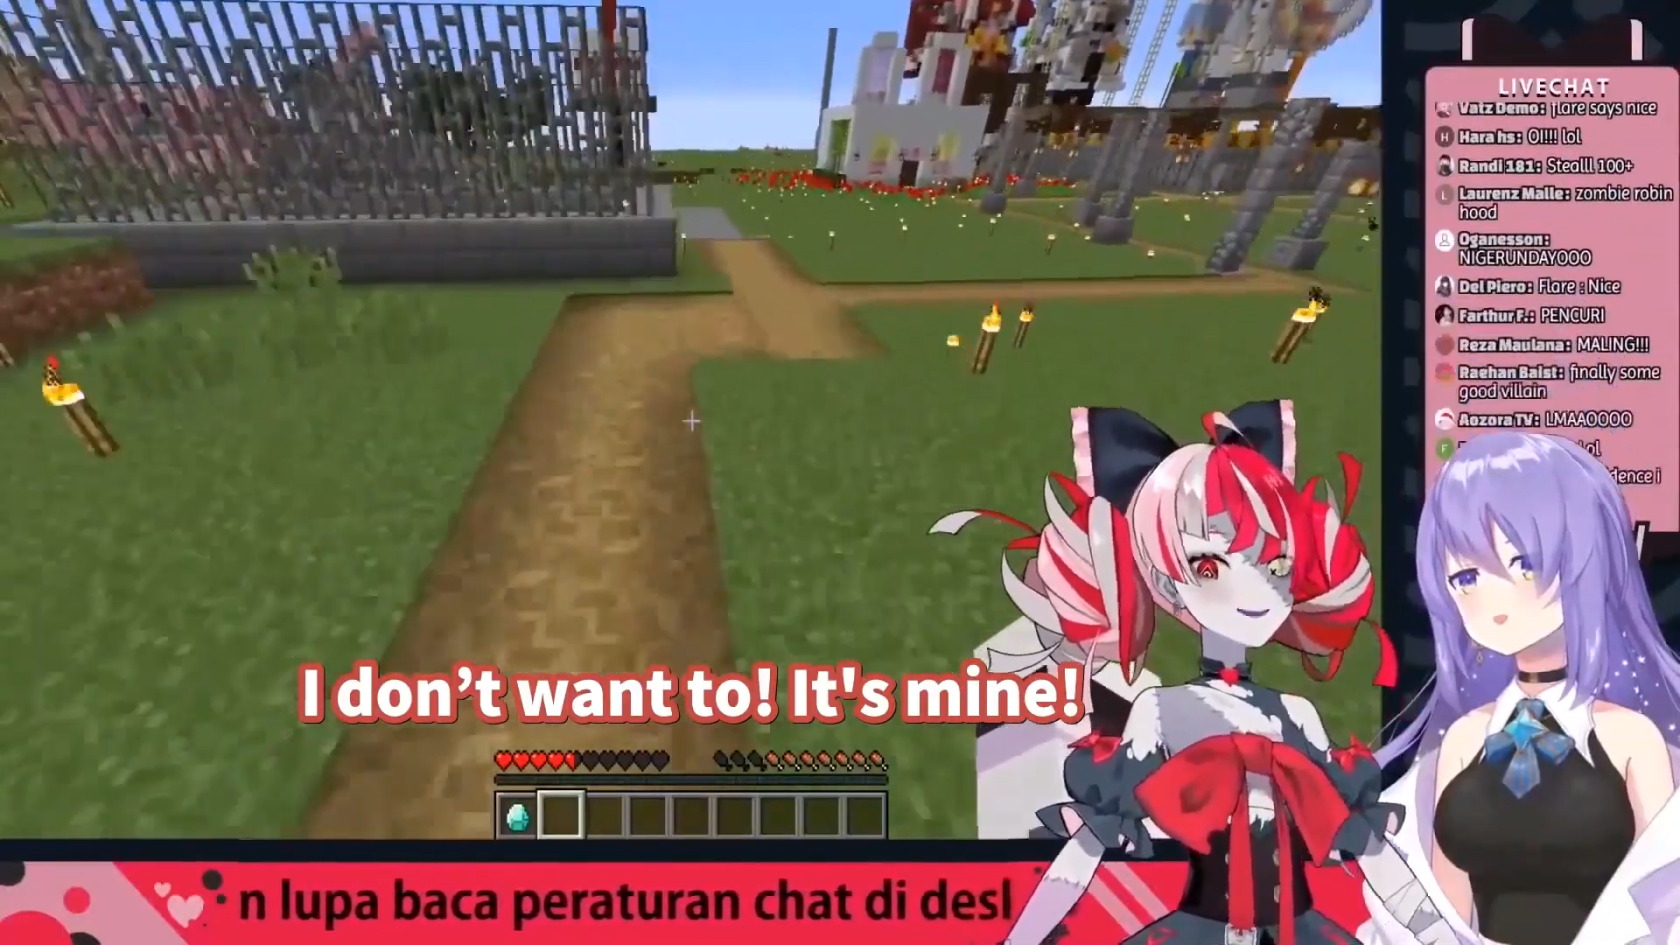
Standard subtitles made to fit the game’s UI
Taken from Ollie tries to steal from Moona, fails [Hololive Eng Sub | Kureiji Ollie / Moona Hoshinova]
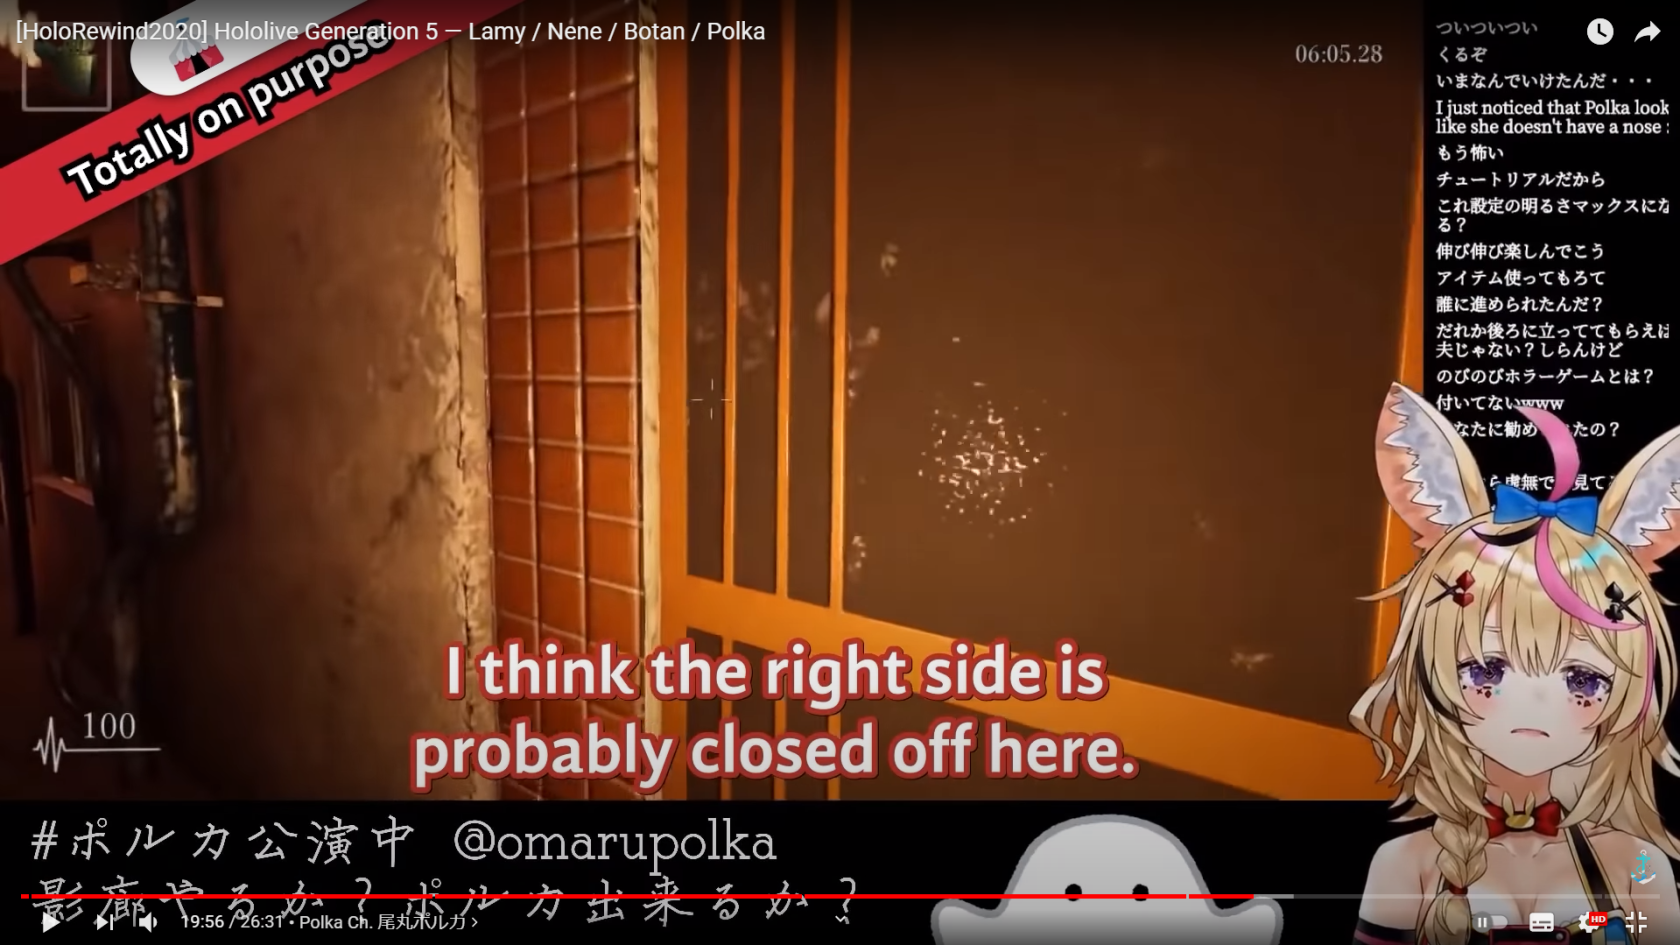
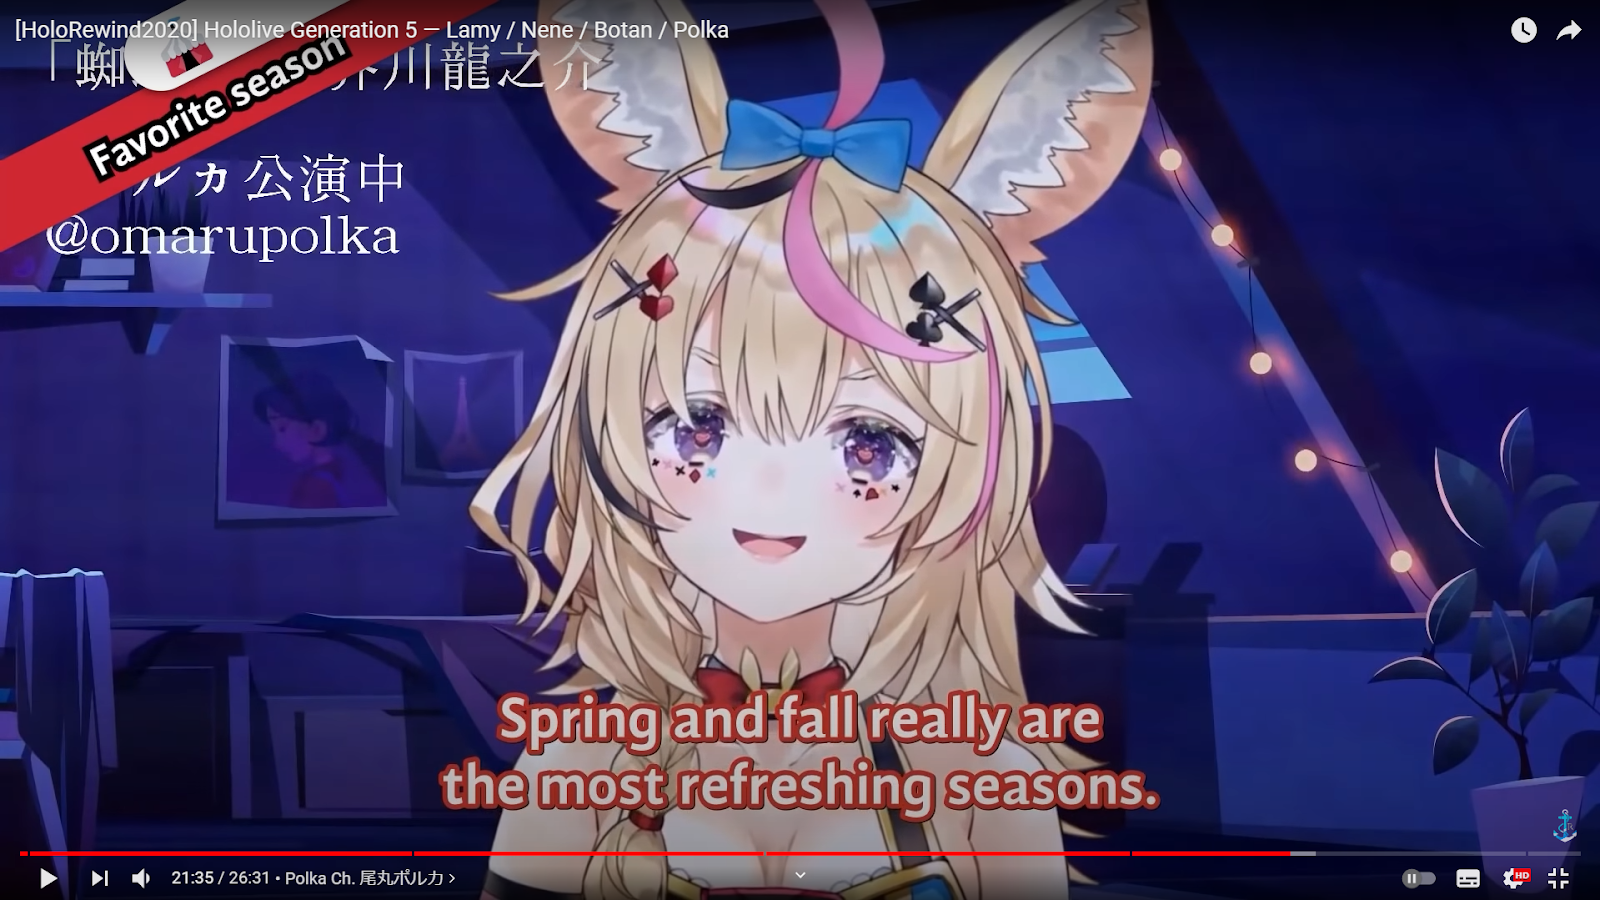
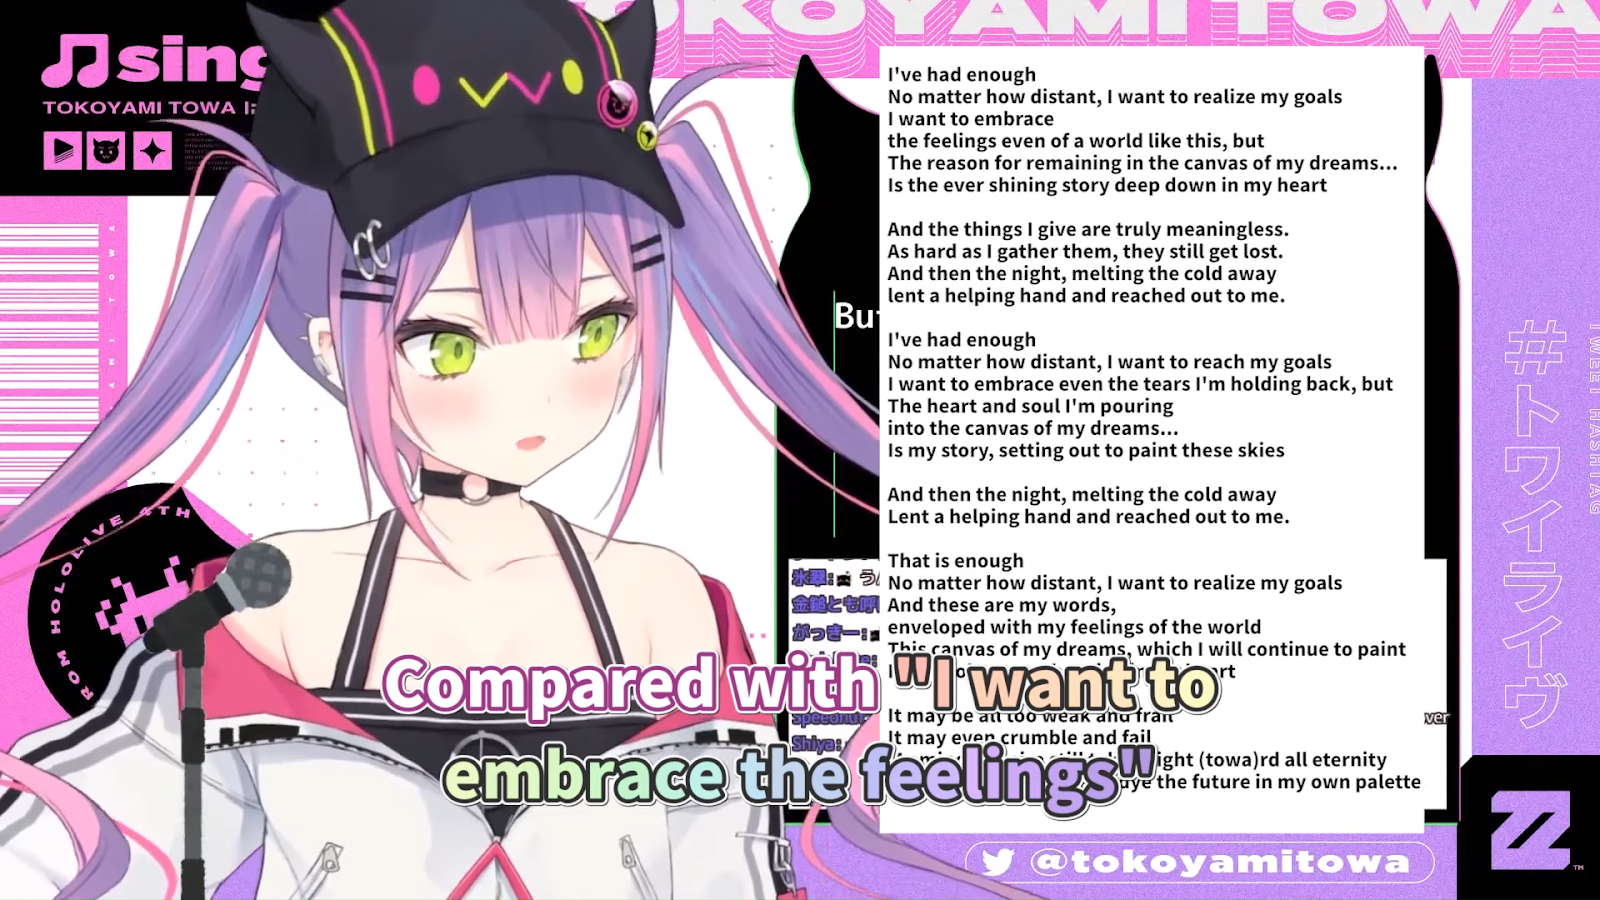
Standard subtitles with color and border modifications
Taken from Towa explains the meaning behind “Palette” [Hololive Eng Sub | Tokoyami Towa]
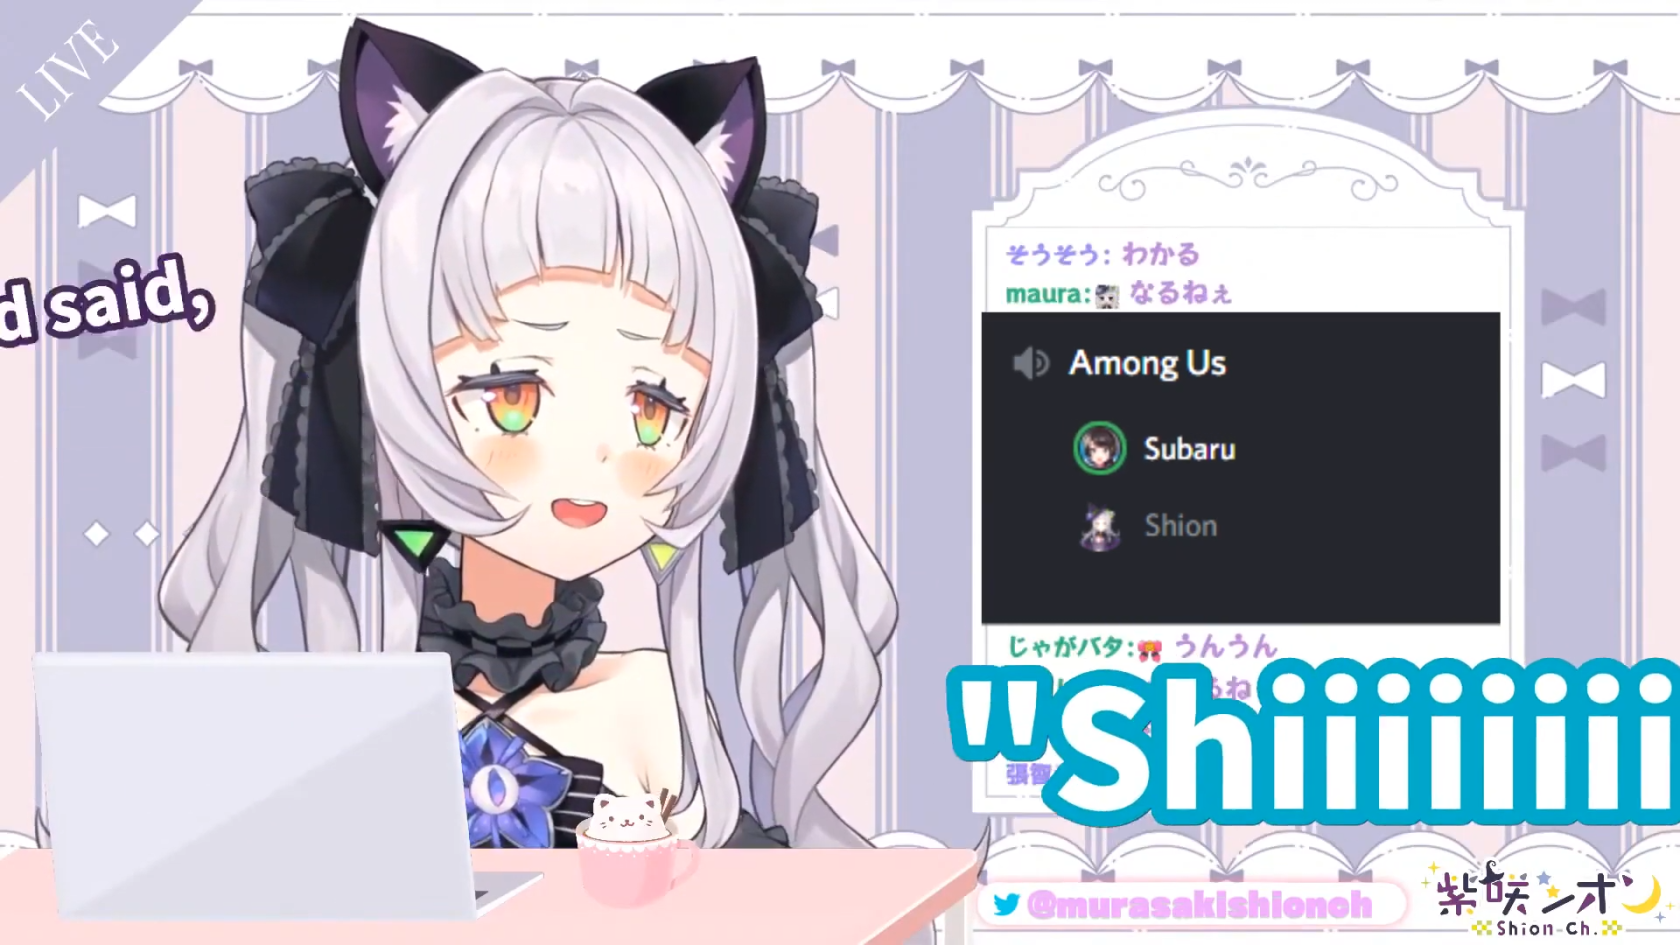
Standard subtitles with animation and size modifications
Taken from Subaru got stood up feat. Shion [Hololive Eng Sub | Murasaki Shion]
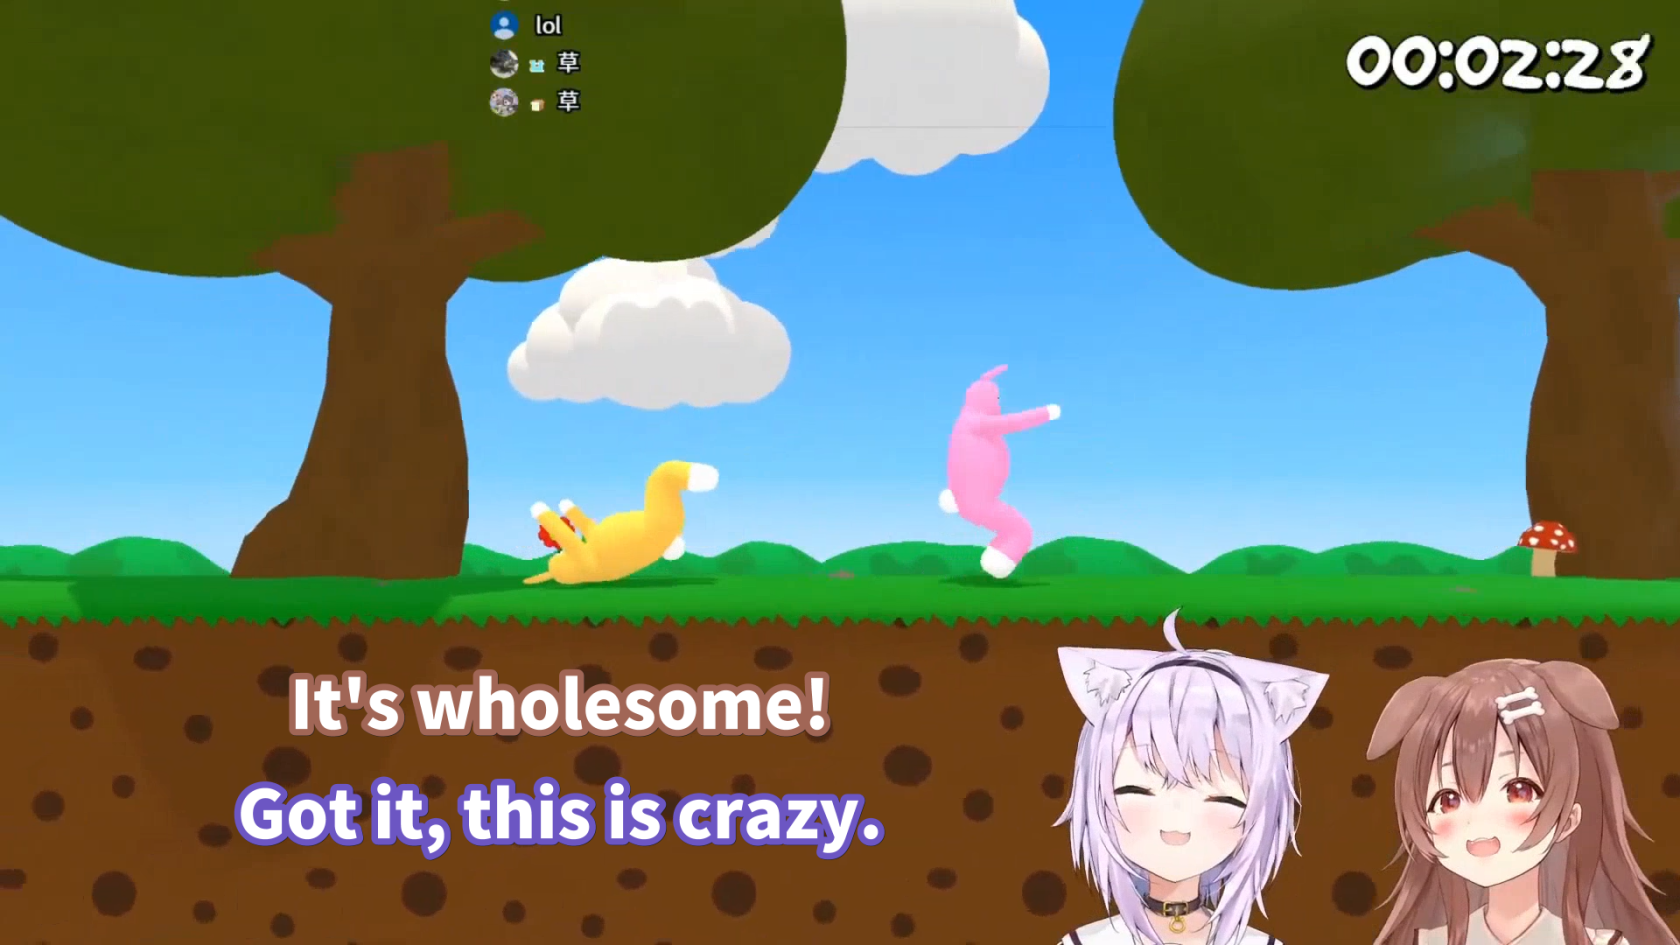
Standard subtitles with placement adjustments and multiple speakers
Taken from the HLR Subbing Test
Non-HLR sub implementing HLR guidelines with custom font / typeface
Taken from Selen fights Giganto in Sonic Frontiers
![Masao T - Selen fights Giganto in Sonic Frontiers [OnxkKWfcj5E - 1920x1080 - 0m06s].png](https://wiki.holoresorttls.org//uploads/images/gallery/2025-06/scaled-1680-/TjWfKc5Z0F0NrTBx-masao-t-selen-fights-giganto-in-sonic-frontiers-onxkkwfcj5e-1920x1080-0m06s.png)
Additional Typesetting References
Here are some additional resources you may find useful:
- Subtitling Guide by lyger
- BBC Subtitling Guidelines
- English Timed Text Style Guide by Netflix
- Typesetting in Aegisub by unanimated
Tag Manipulation Guidelines
Also known as “Animated Subtitles” or “Text Effects”
More information can be found in the Aegisub Docs: ASS Override Tags
Using Tags
- Plain subtitles are fine but they can be more interesting.
- You can manipulate how the tags look depending on how the line was said. It can either be a scream, a sigh, or anything else!
Action Subs and TL Notes
Action Subs in general
Short Answer: No.
- Long Answer: This can be represented with an edit instead.
- Action Subs are *cute laugh* *sneeze* *oh look how cute she is* *brrr*
- Unnecessarily dictates what the talent is doing; sounds and noises.
If the Action Subs are specifically mentioned by the talent
- Some action subs can be localized by the translators appropriately.
- Most action subs are left in the hands of editors.
You don’t use asterisks (*)
Laughs / www / 草
If you’re new or even experienced in subbing, I kindly advise you don’t add them and leave them to the editor instead.
TL Notes
- These are to be avoided as much as possible.
- If you do have to add it and if an image can be added, add an image instead.
- If it can be added above the text that specifically needs the note, you can add a small text above it instead. (FuriNotes)
Basic Principles of Complex Animation
- This part is only useful once you know how to manipulate tags efficiently.
- The speed of change of the tags will be dependent on how it’s timed.
- If the change is quick and the timing is short, it’ll be intense.
- If the change is slow and the timing is long, it’ll be relaxed.
Animated Tag Stacking

\t Tag Stacking
- 0 - Starting time (by the millisecond)
- 4900 - Ending time (by the millisecond)
- 1 - Acceleration of the animation (multiplier of 1)
- You can stack \t tags in the same line as long as you add the appropriate starting and ending time.
- The Numbers marked in yellow are variables and can be adjusted + it’s relative to the timed line.
- In this case, the line is 5 seconds long (5000ms)

Move Stacking
- Line 15 is moving on the 30th of a second
- Line 16 is moving at a full second
- The final position of Line 15 is the starting position of Line 16
- By this, since the move tag can’t be stacked in one line, we go around this by using multiple lines, creating an illusion of acceleration.

Extreme Example
- An example to represent how far and complicated you can stack tags and create something like this.
- It’s messy, I know.
Hardsubbing Subtitles
(also known as “burning-in” subtitles)
petzku's Encode Clip (recommended method)
This uses an Aegisub script called Encode Clip to hardsub video. This provides the most color-accurate and fastest encoding compared to older methods. The drawback is that it uses mpv instead of ffmpeg to encode.
This is the recommended method for all HoloResort Translations subbers. It is highly encouraged that you use this method for hardsubbing. Consult with your team lead if you need to use a different method.
Installation:
- Install mpv here: https://mpv.io/installation/
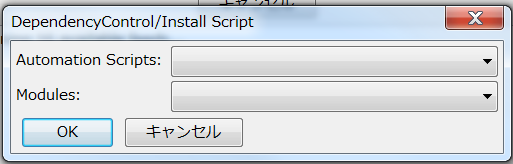
- Open Aegisub and click
Automation > DependencyControl > Install Script. - On the
Automation Scriptsdropdown, look forEncode Clip, select it, and then clickOK.
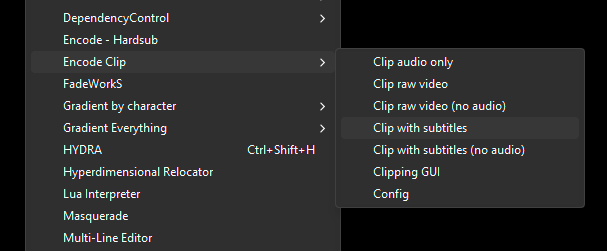
How to use:
- Save your ASS file.
- Create a new line encompassing the lines to be subbed and then select it, or select the multiple lines to be hardsubbed.
- Click
Automation > Encode Clip > Clip with subtitles. - Done!
When installing mpv, it must also be installed on your PATH. If you encounter an issue with mpv not being found, go to Automation > Encode Clip > Config and then set the mpv location manually. For more information on Encode Clip, go here.
lyger’s Clipper Method
Installation and usage can be found here.
- When hardsubbing, make sure your raw video is MKV. If not and what you used is an MP4, your timing will be pushed back by 1 frame.
- Hardsubbing from MKV to MP4 will still push back by 1 frame.
- You use Clipper to clip a part of the video.
- Useful for testing tag animation in hardsubbed form.
- Just set the timing to cover the part you wanted then run the script!
Modded HLR Clipper
- https://github.com/Sheer-Curiosity/HLR-Clipper/releases/tag/v1.0
- Fixes some things that the HLR team specifically asked for
- Just put the .lua in the same place you put lyger’s clipper!
Ragtag Method
Simply use ffmpeg in the CMD prompt to hardsub. Used by Aonahara peeps.
ffmpeg -i “[input video].mp4” -c:a copy -vf subtitles=“[subtitle file].ass” -crf 17 “[output video].mp4”
- Madekuji’s GUI to write the cmd line for you: https://mdkj.dev/hardsubcode/
- This only hardsubs the entire video.
- A quick and simple way of hardsubbing video when you just want to get it done.
Subbing for YouTube Closed Captions
Typefacing and submission for YouTube closed captions require a very different process for everything. You will still be using Aegisub, albeit differently.
YTSubConverter
YouTube uses .ytt files for advanced subtitle styling in the YouTube player and not .ass. Aegisub does not support this format, thus a converter is needed.
YTSubConverter can be downloaded here: https://github.com/arcusmaximus/YTSubConverter

Sample Files
The program includes two sample ASS files to work with: sample1.ass which is for traditional clip subbing, and sample2.ass which focuses more on karaoke subbing.
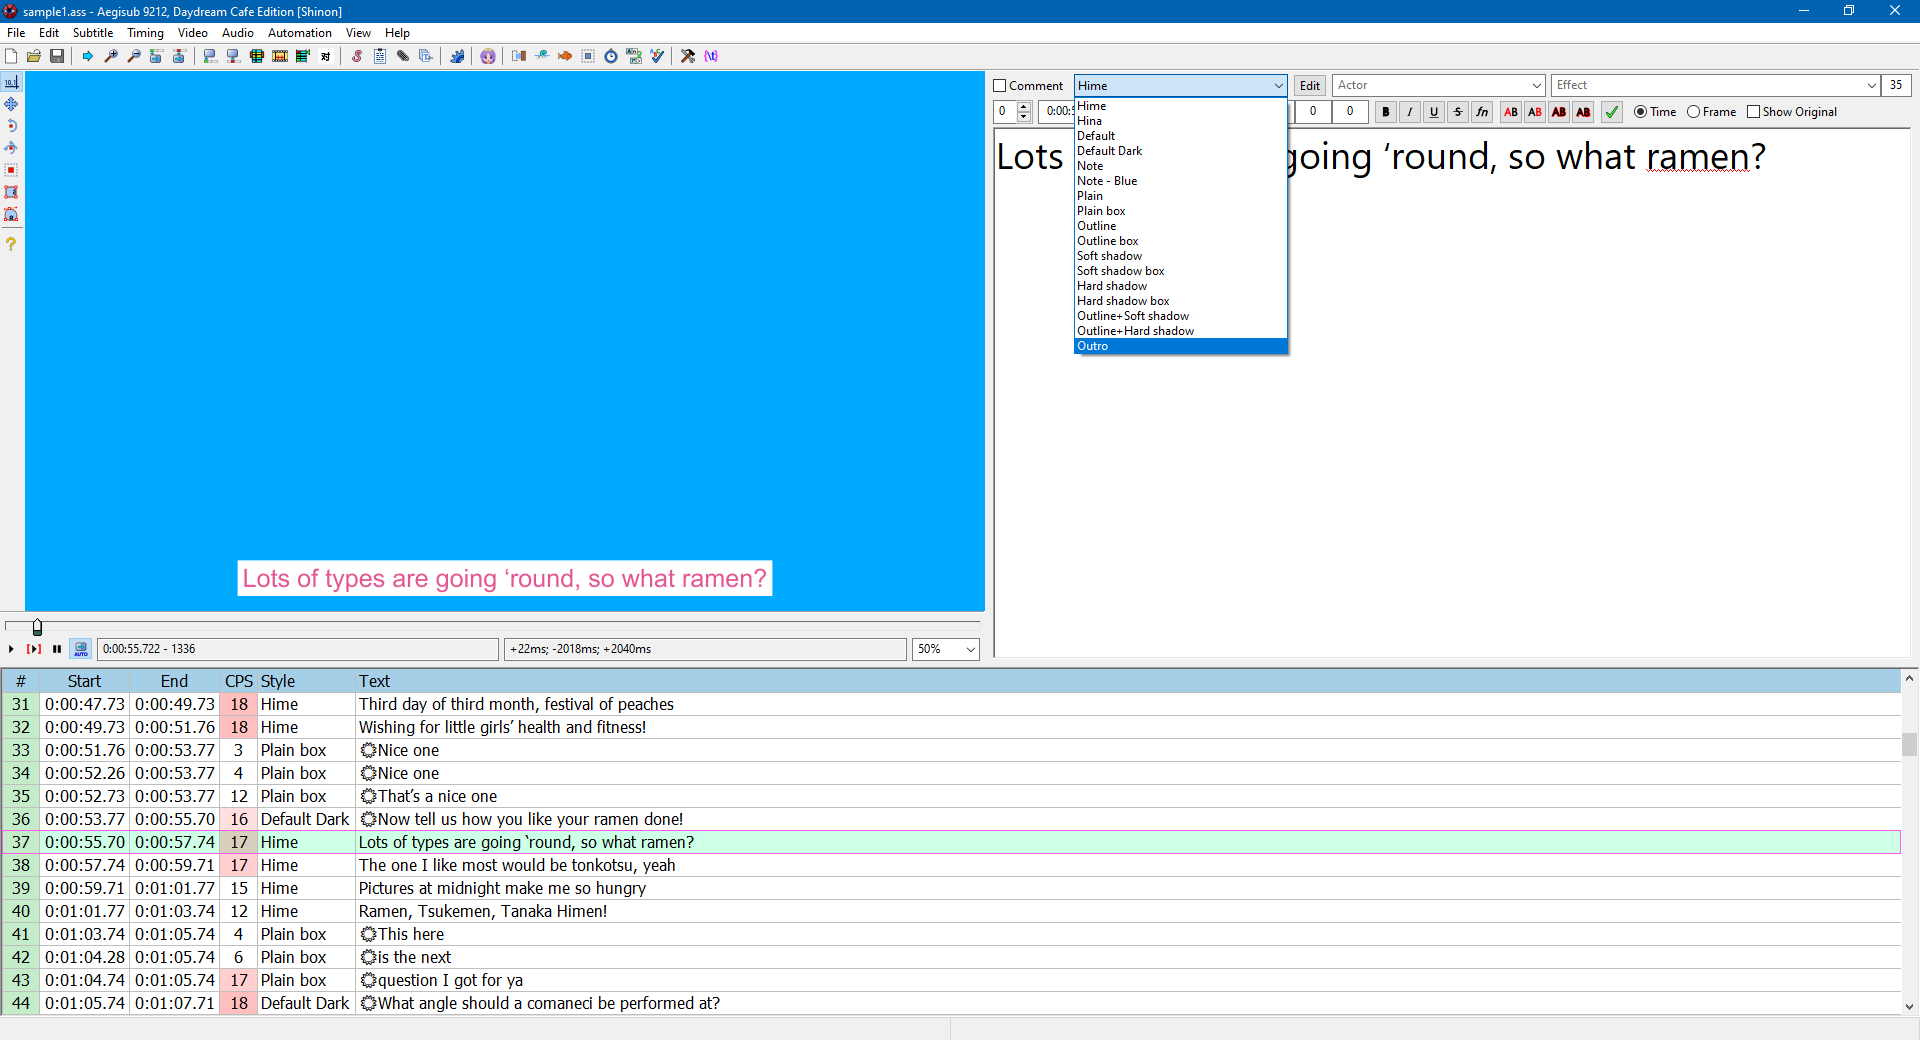
For most of our subbing use cases, it’s recommended to take a look into sample1.ass and see how you can implement proper typesetting with the presets.
This is how Aegisub stylings will be converted to YouTube’s stylings:
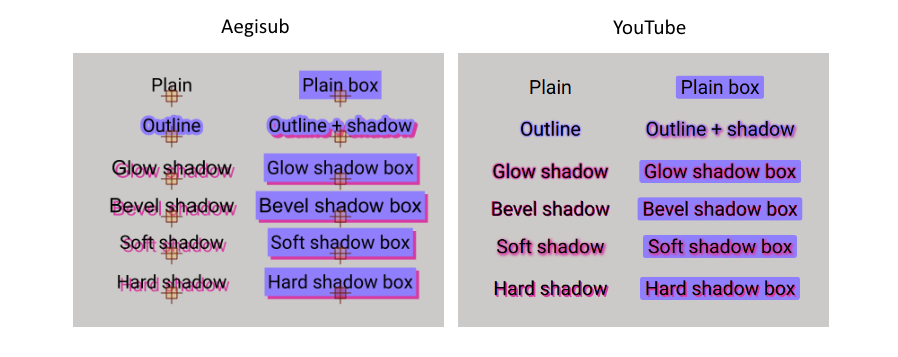
sample1.ass has most of these examples covered, so feel free to experiment with the styles from there, copy and modify them as you wish.
YTT-specific tricks
YTSubConverter allows you to make use of different types of animation or effects regardless of the limitations of YouTube’s subtitle format. You can refer to the README for specifics, but notable examples include {\ytshake} and {\ytchroma}.
Conversion
Once your options are selected, click on Autoconvert to turn your ASS into a YTT file.
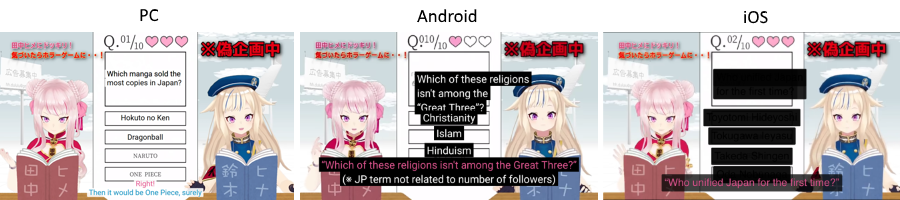
Testing
- You can test on PC in two ways: through Fiddler (explained in the readme, which requires existing video) or by uploading your private copy and uploading the YTT to it. (better for non-uploaded videos)
- You can test on Android either with your phone or an Android emulator or compatibility layer such as BlueStacks, WSA, or Waydroid.
Copying an existing video’s styling
YTSubConverter also allows reverse conversion, from YTT or SRV3 to ASS. This allows you to copy the style or make an edit to the YTT file easily. You may download the subtitle file through youtube-dl or by using the link in the README.
Limitations
Some things may not work on all devices, so keep that in mind. There are things that you may have to compromise when applying a style to work on mobile, so weigh your options. Do you want to keep things consistent or provide a better experience for those on PC? Your choice.
Positioning may be different in PC and mobile. Always test and compromise.
I highly recommend taking a look at official subtitles from hololive production, especially the Holo no Graffiti series, as the subtitles are typeset in a way that can work for both desktop and mobile.
Automation Tools
What version of Aegisub do I need?
Please refer to the Aegisub Setup page for details on the arch1t3cht fork of Aegisub, which has first-class support for automation tools.
Aegisub 3.4.0 and later also has support for DependencyControl, but you have to install with Full installation.
DependencyControl Tools
These are tools that you can install once you have arch1t3cht/Aegisub or Aegisub 3.4.
Automations > DependencyControl > Install Script
Here are some useful tools and the basics on how to use them. They are also known as “scripts.”
ASSWipe
- Cleans + Sorts your scripts and removes unnecessary lines, reducing file size.
- This is more useful in soft-subbing
Blur and Glow (Double Border)
- This allows you to automatically add double borders to your subtitles
- This also provides as the name says, Blur and Glow.
Gradient by Character
- This makes your line go through a gradient by changing the colors of each character gradually.
- It can only make a gradient horizontally. Vertically if vertical Japanese.
- This is commonly seen and used in youtube captions.
- Just add at least 2 colors to your line.

- Run the script

Gradient Everything
- This is a more versatile yet complex version of gradient which gives you the ability to gradient horizontally or vertically on the screen.
- You need two same lines separately, yet each having its colors.

- You also need to either input a clip border or have all lines have the same pos.
- Run the script and you will be given an interface where you choose how you’d want to gradient the line.
- It will keep already written tags and still gradient horizontally/vertically.
HYDRA
- Allows you to mass add tags on lines.
- Clicking “Load Full” gives you a lot more options.
Hyperdimensional Relocator
- Yes.
- Shit tons of useful features. Here’s a video that shows some of it.
Masquerade
- There’s a lot of tools that can turn clips into drawings but this one does it best.
- Simply draw a clip, select “from clip” mask type, and click “Masquerade”.
Shapery
- Made to replicate most of the tools used in Adobe Illustrator.
More may be added soon.
Link to manuals for certain tools, including Blur and Glow, HYDRA, Colourise, and Hyperdimensional Relocator:
https://unanimated.github.io/ts/scripts-manuals.htm
Off the Shelf Tools
These are some tools that aren’t in DepCon but can still be accessible through other means. Mainly GitHub.
- Perspective
- Chloro
- Centipede
- More may be added soon.